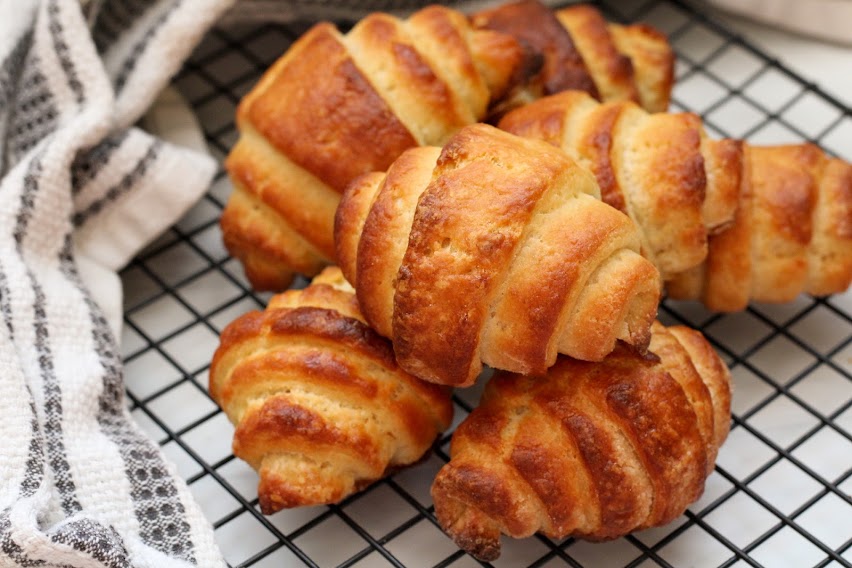
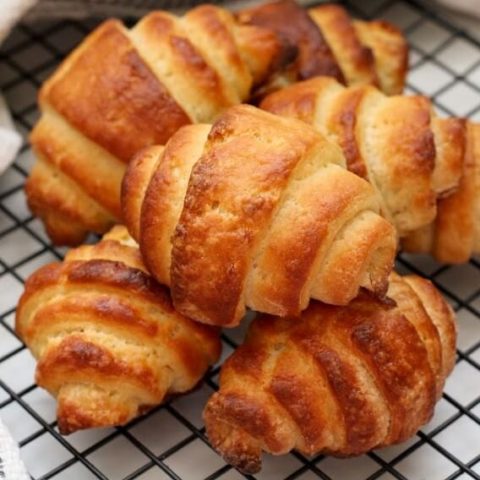
Oh yes, my friend. Gluten-free croissants are here, and they are incredible!
This post may contain affiliate links. Please see my disclosure page for more information. Thanks!
- About This Croissant Recipe
- Background On This Recipe Development
- Ingredients You Will Need For Croissants
- Gluten-Free Flour For Croissants
- How To Make Gluten-Free Croissants
- How To Shape Gluten-Free Croissants
- Tools To Help With Making Gluten-Free Croissants
- Can I Make These Dairy-Free?
- Can I Freeze Croissants?
- Tips For Success & Troubleshooting Common Problems
- More Gluten-Free Baking Recipes
About This Croissant Recipe
There's just nothing like a buttery croissant that makes you feel like you're enjoying breakfast along the Seine River in Paris. Dreamy, don't you think?
Except for the one teensy, tiny, microscopic problem.
Finding a gluten-free croissant, whether in grocery stores or in a bakery, is challenging!
They seem to be the one pastry that eludes gluten-free people.
And yes, I know Schar makes them, and they are tasty! But I wanted the satisfaction of knowing I could make gluten-free croissants myself.
Making croissants involves the process of lamination, where you seal butter into the dough. This is done multiple times to create layers that when baked, puff up for the light and airy croissants we all enjoy.
Background On This Recipe Development
So last summer I attempted croissants for the first time. And well, it was mediocre at best.
I started with modifying a traditional croissants recipe. It took 24 hours, lots of lamination of the dough, and they ended up looking like this:

They were very dry, the butter leaked, and they really didn't puff up as I hoped. So I decided to write down what I did, and revisit them again - knowing that with some tweaking, they'd be a success.
Earlier this spring, I came across GF Jules's method for croissants. If you don't know Jules, she's an amazing resource in the gluten-free community, with her own gluten-free flour blend, TONS of recipes, and has been spreading awareness of celiac disease for years. She's awesome!
Thanks to GF Jules and her croissant methodology, I realized that I didn't have to go through the crazy process of making traditional croissants. I just needed to change a few things! So that's exactly what I did this summer using Cup4Cup and a few tricks I've learned since publishing my Gluten-Free Breads Around The World eBook last fall.
And this time, they were amazing. The dough was much more pliant, the croissants puffed up amazingly, and it didn't take 24 hours! Plus, they were soft, buttery, and PERFECT!
Even Dylan tried them and said they tasted like croissants from the regular bakery down the street.
**cue tears of joy**
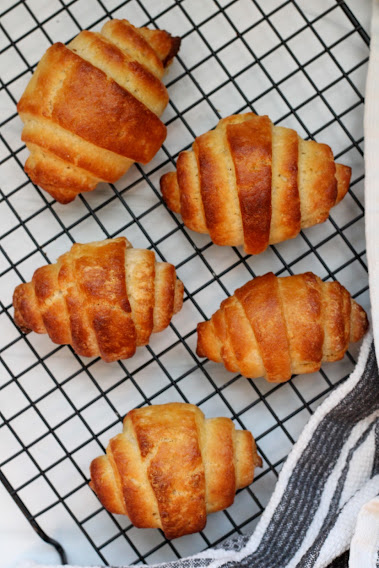
And I mean, just look at the inside of these! The layers!

Ingredients You Will Need For Croissants
Gluten-Free Flour: Cup4Cup is my #1 recommendation for gluten-free pastry! I've used this to successfully create empanadas, naan, scones, soda bread, and pierogi. It's my preferred flour for baking but please be aware it contains dairy. You can substitute your own favorite gluten-free flour blend but be mindful you may need to adjust and troubleshoot as you go.
Instant Yeast: I use Red Star yeast packets for instant yeast and keep a jar of active dry in my fridge. Double-check that your yeast is gluten-free as some can be "enriched". Please remember this recipe calls for instant yeast. I have not tried with active yeast!
Psyllium Husk Powder: I buy mine from Anthony's as they batch-test for gluten-free! I've also used it when making gluten-free sourdough. This gives gluten-free breads and yeast-based baked goods great elasticity.
Other Ingredients You'll Need:
-Baking powder
-Salt
-Sugar
-Butter
-Buttermilk
-Egg (to brush the croissants so they get nice and golden brown while they bake!)
Gluten-Free Flour For Croissants
You need a gluten-free flour blend to make this recipe. Almond flour or coconut flour will not work here. This recipe is specifically made with Cup4Cup Multipurpose Gluten-Free Flour. So if you want your croissants to come out exactly like you see in the photos, this is the flour blend to use. You can substitute your favorite gluten-free flour blend but this may require additional adjustments.
Based on my experience with gluten-free baking, the flours that I believe would work well to substitute here would be GF Jules, Bob's Red Mill 1:1 Baking Flour (Blue bag, not red bag!) or Better Batter. The ingredients and components of these flours are the most similar to Cup4Cup. Again, this will require you to make adjustments as needed.
How To Make Gluten-Free Croissants
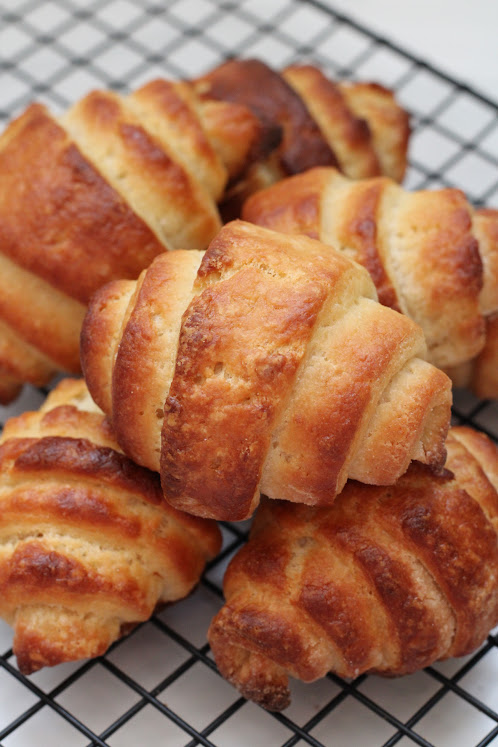
There are MANY steps to making croissants, especially gluten-free ones! So here's an overview of what happens, as it's not exactly the same as regular croissants (thanks to GF Jules recipe development!)
First, you'll prepare the butter into the "butter block". It needs to be room temperature so you can shape it. Place it between two sheets of parchment paper or wax paper, and using a rolling pin, crush it and roll it out, until it is approximately 8''x 6''.
Next, you'll prepare the gluten-free croissant dough, by whisking together the dry ingredients, then slowly adding the melted butter and buttermilk until the dough forms a ball.
Then, it's time for the 1st rollout of where you will seal the block of softened butter into the dough. This is called lamination. We will do 4 total rollouts of the dough!

For the first roll out, you will roll out the dough with a rolling pin to a 14”x 10” rectangle. Then you'll place the block of butter on the bottom half of the dough, and fold the top half of the dough over the butter block and seal it together with your fingers. Then you'll give the dough a quarter turn.
Then it's time for the 2nd rollout, where you will roll out the dough to a rectangle shape of 16"x 10" - a little bit bigger. Then you'll do the first of the "Book" folds by folding the top of the dough down towards the center of the dough, and then fold the bottom half up towards the center as well - just like a book. Rotate the dough one quarter turn, and repeat the book folds.
Then you'll do a 3rd rollout, rolling the dough again to the rectangle shape of 16" x 10", and folding like a book from top to bottom, doing a quarter turn, then folding like a book again.
After completing 3rd rollout & bookfolds, wrap the dough in plastic wrap or parchment paper and place it in the fridge for 1 hour.
How To Shape Gluten-Free Croissants
Once the dough has refrigerated for 1 hour, then it's time to shape the croissants!
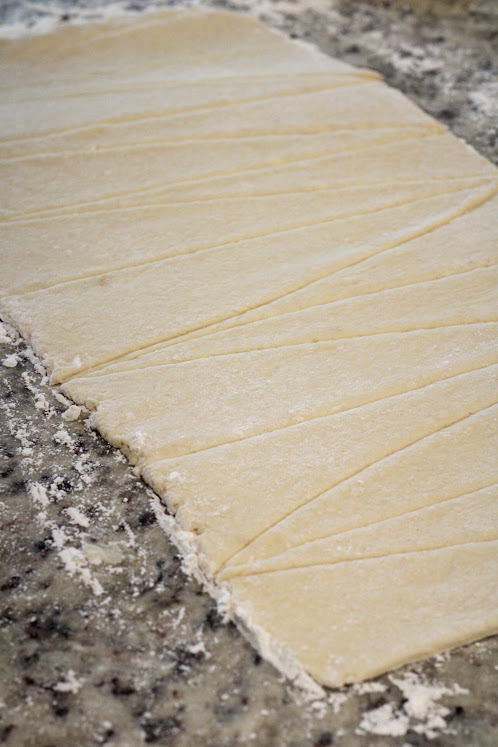
This time you'll roll the dough out (4th rollout) to the largest rectangle shape of 10”x 24”. Then, using a pizza cutter or a sharp knife, you'll cut across the dough into long rectangles. This should give you 8 rectangles. With each rectangle, cut diagonally in half into long triangles, which will give you 16 triangles.
With each individual triangle piece of dough, you'll cut a small slit in the middle of the bottom of the strip (the fatter side), like this:

And then you'll take the two bottom pieces and spread them apart, rolling up the croissant tightly from bottom to top into its signature shape.

After doing this with all of the triangle pieces, you'll place the croissants onto a parchment or silicone baking mat lined baking sheet. Cover them with plastic wrap or a large towel and allow them to rise in a warm place for 1 hour.

Finally, after the 1 hour rise, you'll brush the croissants with an eggwash and then bake at 400 degrees Fahrenheit until evenly browned for about 20-25 minutes until they are perfect!
Phew! Like I said, LOTS of steps, but the end result, is so worth it!
Tools To Help With Making Gluten-Free Croissants
Rolling Pin & Pizza Cutter: This helps for both rolling out the dough and cutting into triangles when it's time to shape the croissants. Both of mine are from TJ Maxx!
Baking Sheets: I recommend these from Nordic Ware.
Silicone Mats: Not required, but helpful and less wasteful than using parchment paper. I use SilPat because they last forever!
A ruler or tape measure: There's quite a bit of measuring involved in croissants as you laminate the dough. Definitely recommend having a tape measure nearby!
Bench scraper: While I shape the dough with my hands, you can also use a bench scraper, like this one, to help shape your dough and square off your edges.
Pastry brush: You'll use this to brush off flour from the dough as you make the croissants.
Can I Make These Dairy-Free?
Due to the nature of this recipe requiring butter to create the flaky layers of pastry, I am not sure! I'm still in the process of testing these in a dairy-free version. You can check GF Jules recipe for her dairy-free recipe.
Can I Freeze Croissants?
I have not tested freezing croissants, but GF Jules has! Please refer back to GF Jules for more tips on this!
Tips For Success & Troubleshooting Common Problems

Croissants are tricky. Pastry can be tough to make, especially gluten-free pastry. Here are my top tips for success in making gluten-free croissants!
Don't make pastry on a hot day.
Warmer temperatures mean your pastry is going to be more difficult to work with. Stick to a cooler day to make croissants, if possible!
Baking by Weight
Is baking by weight the most accurate and precise way to bake gluten-free?
Yes. I've done it when when making homemade gluten-free pizza.
But is it realistic?
Not really.
In my experience, most people don't have the time or even a kitchen scale to bake this way. If you are looking for the measurements of this recipe in grams, you can check the original from GF Jules, who writes hers in grams.
Be careful how you measure your gluten-free flour.
Along the same lines, and one of my top gluten-free baking tips, if you aren't measuring for weight, then be sure to spoon your flour into your measuring cup, then level off with the back of the knife. This makes sure you get an accurate amount.
Give yourself a good amount of time.
This recipe has many steps and a good amount of time required for resting and proofing the dough. Allow a good 4 hours to make them from start to finish.
Follow. The. Recipe.
This recipe is specifically formulated using Cup4Cup Multipurpose gluten-free flour. If you decide to change anything or substitute other ingredients, they may come out differently than expected and I cannot speak to your results. My experience is in gluten-free and some dairy-free baking, but not allergy-free, vegan, or egg-free. You can always email me: [email protected] with any questions and I'm happy to help troubleshoot the best I can.
Refrigerate the dough if it is difficult to work with.
If you notice your butter is leaking through your dough as you are laminating, or that your dough is too soft and starts ripping, it might be too warm. Wrap it in plastic wrap or parchment paper and place back in the refrigerator for 30 minutes to cool. Then remove and try again. Trust me - don't try to force the dough to do what you want when it's too warm. Be patient, refrigerate, and try again. It definitely helps!

Make sure to proof your dough for the required time.
Rushing through the steps can lead to croissants cracking while baking or butter leaking out the bottom. Allow the allotted time for the dough to rest and rise - it's worth it in the end!
Watch a video to understand how lamination works.
Originally, I watched this video from Sally's Baking Addiction to understand lamination and how croissants are made. While OBVIOUSLY these are NOT gluten-free, I'm linking her video here to SHOW YOU this process so you can better understand it! And sometimes (if you are visual learner, especially!) watching someone do something first can really help.
Reheat in the microwave the next day.
Like most gluten-free baked goods, these will harden over time. To return them to their flaky, soft, buttery delicious selves, reheat in the microwave for 10-15 seconds!
More Gluten-Free Baking Recipes
Feel like an easy quickbread? This banana bread with walnuts is a winner!
Looking for a gluten-free scone recipe? Be basic and enjoy it with these gluten-free pumpkin scones and maple frosting.
Want to practice your pie making skills? Homemade apple pie hits the spot. Gluten-free but no one will know!
Loved the croissants and want another similar recipe? Check out these gluten-free beef and cheese empanadas with a homemade dough!
Discover all the gluten-free baking recipes on the blog right here.
Here's how to make gluten-free croissants!
If you love this recipe, please leave a comment! Thank you so much!
Gluten-Free Croissants
Ingredients
- 3 cups Cup4Cup Multipurpose Gluten-Free Flour Blend (If you use another GF Flour blend, I can't speak to your results)
- 2 packets of Instant or Quick Rise Yeast
- ½ cup granulated sugar
- 2 teaspoons salt
- 2 teaspoons baking powder
- 2 teaspoons psyllium husk powder
- 1 ½ cups buttermilk
- 4 Tablespoons melted unsalted butter
- 1 ½ sticks (12 Tablespoons) of unsalted butter, at room temperature
- 1 egg mixed with 1 Tablespoon water
Instructions
First, prepare the butter. Allow the 1 ½ sticks of butter to soften to room temperature. Place it between two sheets of parchment paper or wax paper, and using a rolling pin, crush it and roll it out, until it is approximately 8''x 6''. This is where you can use a knife or a bench scraper to square off the edges evenly.
Next, prepare the dough. In the bowl of your stand mixer (or you can just use a large bowl), whisk together all of the dry ingredients. Melt the butter in the microwave or on the stovetop. While the mixer is running with the paddle attachment on low (or just mix with a large spoon if you don't have a stand mixer), slowly add the melted butter followed by the buttermilk. Mix for 1-2 minutes as the dough begins to form, then increase speed to medium and mix for an additional minute until the dough is evenly mixed throughout.
Pour the dough onto a lightly floured surface, and lightly flour your hands as you knead it a few times. If it feels too sticky, sprinkle more gluten-free flour and knead a few more times. If it feels too dry, add 1-2 tablespoons of buttermilk if necessary.
1st Roll Out: Add Butter
Make sure you have lightly floured a large surface area of your clean countertop. Roll out the dough to a rectangle shape of 14”x 10” rectangle. Continue dusting additional gluten-free flour both on top of and underneath the dough so it doesn't stick. Use your bench scraper or hands to shape the dough, then brush off any excess flour on the top of the dough using your pastry brush.
Place the block of butter on the bottom half of the dough, but be sure to leave space on the sides and bottom. Fold the top half of the dough over the butter block and using your fingers, seal it together. Give the dough a quarter turn.
2nd Roll-Out & Book Folds
Once again, roll out the dough after sealing butter. Continue flouring above and beneath the dough as needed so it doesn't stick as you roll out the dough this time to 16”x 10” rectangle. Use your bench scraper or hands to shape the dough, then brush off any excess flour on the top of the dough using your pastry brush.
If butter or dough gets too soft at any point, wrap and place in the fridge for 30 minutes to an hour.
Fold the top of the dough down towards the center of the dough, and then fold the bottom half up towards the center as well - just like a book. Brush off excess flour again and rotate the dough a quarter turn. Once again, fold the top portion of the dough down to the center, and the bottom portion up to the center, like a book.
3rd Roll-Out & Book Folds
Repeat these book fold steps one more time - rolling out the dough to 16''x 10'' rectangle, flouring above & below as needed, folding dough like a book from top and bottom into the center, give a quarter turn, and fold like a book again. If necessary, wrap the dough and refrigerate it between folding in order to keep the butter from melting.
After completing the 3rd rollout & set of book turns, wrap the dough in plastic wrap or parchment paper and refrigerate for 1 hour.
4th Rollout & Shaping Croissants
Make sure your countertop is lightly floured on a large surface - this is the largest rollout!
Roll out dough to 10” x 24” rectangle. Using a pizza cutter or a sharp knife, mark the dough along the 25'' side at every 3” or for larger croissants at every 5” (this will not yield as many croissants, just FYI). At each mark, cut across the dough into long rectangles. This should give you 8 rectangles. With each rectangle, cut diagonally in half into long triangles. This should give you 16 triangles.
Brush off any excess flour from the dough before shaping, which helps the dough stick better.
With an individual triangle piece of dough, lay it out in front of you with the point facing away from you. Cut a small slit in the middle of the bottom of the strip. Spread the pieces apart and roll up the croissant tightly. Place on a sheet pan lined with parchment or a silicone mat, seam side down. Repeat with all remaining triangles. Cover with plastic wrap or a large towel. Allow them to rise in a warm place for 1 hour (I place mine next to my oven as it is preheating).
Bake The Croissants
While croissants are rising, preheat the oven to 400°F.
After rising, brush croissants with 1 egg whisked with 1 Tablespoon of water thoroughly over the top of each croissant so they get nice and golden brown. Bake until evenly browned, about 20-25 minutes. You can also brush the tops with buttermilk for an egg-free option, but they may not brown as much.
Allow to cool completely on a baking rack.
Notes
There are many steps to this recipe. Please scroll to the top of this post and read through it for a more thorough explanation, photos, and tips. For additional information in making gluten-free croissants, please see GF Jules' recipe, which is what these are based on.
Eat Fresh: Croissants will taste best fresh, as gluten-free baked goods tend to harden over time. You can pop them in the microwave for 10-15 seconds to soften as needed. Best to eat within 2-3 days.
Warm Dough: If at any point the croissant dough is breaking, or butter is melting through the dough, wrap in plastic wrap or parchment and place in the refrigerator for 30 minutes.
Chocolate Croissants: You can make these into pain au chocolat. Rather than cutting the rectangle strips into triangles, leave them as rectangles and place a piece of chocolate on one end. Roll them up and place seam side down onto the baking sheet. Follow the rest of recipe as written.
Freezing Croissants: I have not tested this, but according to GF Jules, you can. Please click here to read her instructions for Freezing.
Nutrition Information
Yield 8 Serving Size 1Amount Per Serving Calories 323Total Fat 10gSaturated Fat 5gTrans Fat 0gUnsaturated Fat 3gCholesterol 46mgSodium 749mgCarbohydrates 52gFiber 2gSugar 15gProtein 8g
The nutrition information on each recipe card is provided as a courtesy and for your convenience. The data is calculated by Nutritionix. You are encouraged to make your own calculations based on your ingredients and preferred nutritional facts calculator. While I try to make sure they are accurate, I cannot guarantee the accuracy of these calculations.
When was the last time you had a croissant?
Let me know in the comments below!


Eli Murphy says
Hi, can I get an interpretation for «’3 cups Cup4Cup’ Multipurpose Gluten-Free Flour »
For the gluten free croisants? Im not really sure what that means.
Much thanks!
Jennifer Fitzpatrick says
As I share in the post, the brand of gluten-free flour blend I use for these croissants is called Cup4Cup, and it is their multipurpose gluten-free flour that does the best job. I'm not sure how else to explain this..
Alene says
Hi! I just found you and I'm so happy I did. I am gluten intolerant but now I can't eat rice either. It makes gluten free baking quite hard. I just bought Thomas Keller's Cup4Cup Ancient Grains gluten free flour that has no rice. I recently tried it in a one for one swap with all purpose flour, and it worked fabulously! They say it is a one for one swap for any flour, gluten free or not. I wonder if it will work in this croissant recipe. Thank you!
Jennifer Fitzpatrick says
Hi Alene! Thank you for visiting the website. I hope you feel better soon! I've used the Ancient Grains Flour before but not for the croissant recipe. I think they may not be as flaky, and the texture might be a bit different, but it could work! You'll have to experiment. I'd suggest making sure you aren't making croissants on a warm day (that makes the dough more difficult to work with). Good luck!
Brigitta Balogh says
We’ll I just tried this recipe last night .I just like to say ,thank you for sharing it .
Came out fantastic ,and a flavor,yes just like regular croissant:)
Thank you again for sharing it ,so we gluten free people can make it
Jennifer Fitzpatrick says
Comments like this make me so so happy 🙂 Thank you, Brigitta, for taking the time to share! So glad you enjoyed it!
Antonia Sattler says
Alterative to the sugar? To make them refined sugar free?
Jennifer Fitzpatrick says
I have celiac disease and only cook/bake gluten-free, not refined sugar free. I can't speak to a substitute because that's not how I create recipes. Sorry!
Katie Phillips says
So does the dough not need to chill between each lamination (folding) like it does with regular croissants? I've had great success with making regular croissants, but my sister can't have gluten, so I want to try to make these for her. Thanks!
Jennifer Fitzpatrick says
No, it does not. Please check the post itself for additional tips and information about this! When there is no gluten to develop, baking is a little different.
TJ says
Can the unbaked croissants be frozen before the step where they are left to rise?
Jennifer Fitzpatrick says
Yes! According to GF Jules, which this recipe is modified from, this works well if you freeze them individually. She shares more in her post here.
Tracey Blackwell says
This recipe looks amazing yummy 🤤
Im wondering if I can make this recipe dairy free? I have dairy free butter, can I use non dairy milk ?
TIA
Jennifer Fitzpatrick says
Please read the full post, not just the recipe card - I share information about making these dairy-free!